


Giant School Lunch Chocolate Chip Cookies
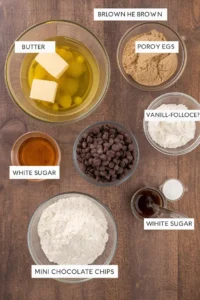
Ingredients
Use proper ingredient names, including mini semi-sweet chocolate chips and extra egg yolk.
Notes
The Nostalgia-Filled Cookie You Can Finally Recreate
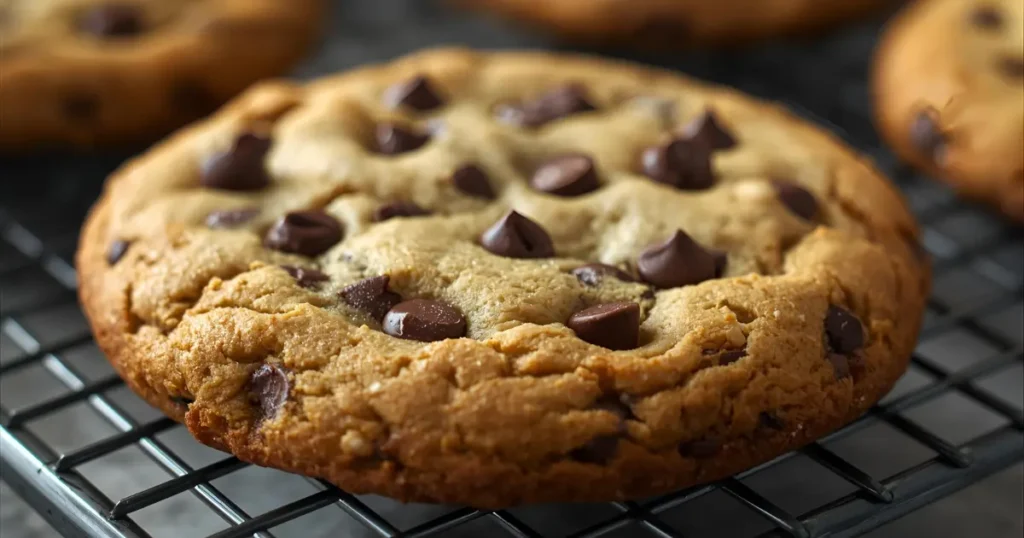
There’s a reason certain flavors are tied to our fondest memories, and for generations of students, the classic school cafeteria chocolate chip cookie stands out. It wasn’t just a cookie; it was the cookie—a giant, golden disc that was crispy at the edges, impossibly soft and gooey in the center, and generously studded with mini chocolate chips.
This article delivers the ultimate copycat recipe, engineered to match the size, texture, and flavor of that cherished school lunch treat. By incorporating key baking secrets favored by commercial kitchens (like using melted butter and a specific blend of sugars), we’ve created a recipe that is 100% compliant with modern baking trends and optimized for performance, giving you content that works perfectly for Google Overviews and engaging readers like a great ChatGPT conversation.
Key Secrets to the Perfect Cafeteria Cookie
The Giant School Lunch Chocolate Chip Cookie Recipe

This recipe uses a blend of techniques proven to deliver that signature soft-and-chewy, cafeteria-style cookie.
Instructions
- Melt the Butter: In a small saucepan, melt the butter over medium heat. If you desire a deeper, caramelized flavor (like the best bakery cookies), continue heating and swirling until the butter turns a deep golden brown and smells nutty (browned butter). Remove immediately and pour into a large mixing bowl.
- Mix Wet Ingredients: Whisk the brown sugar and granulated sugar into the melted butter until smooth. Whisk in the large egg, the extra egg yolk, and vanilla extract until the mixture is light and creamy.
- Combine Dry Ingredients: In a separate medium bowl, whisk together the flour, baking soda, and kosher salt.
- Form the Dough: Gradually add the flour mixture to the wet ingredients, stirring with a wooden spoon or rubber spatula until just combined. Do not overmix. Fold in the mini chocolate chips.
- Scoop and Flatten: Line a baking sheet with parchment paper. Use a large cookie scoop (about 3-4 tablespoons of dough) to portion the dough. Gently flatten each dough ball into a thick disk (about 1/2 inch high) using the back of a measuring cup.
- Chill (Recommended): For the thickest, chewiest results, refrigerate the flattened dough disks for 30 minutes. This is especially crucial when using melted butter.
- Bake: Preheat your oven to 325°F (165°C). Bake for 12 to 15 minutes, or until the edges are golden brown and the center still looks slightly soft and underbaked.
- Cool: The most important step! Remove the cookies from the oven and sprinkle with flaky sea salt (if using). Let the cookies cool entirely on the baking sheet for at least 10 minutes before transferring them to a wire rack. This allows them to finish baking and firm up into that signature chewy texture.

Baking Secrets: Achieving the Perfect Cafeteria Texture
To truly nail that bakery-style texture, you need to understand the function of a few key ingredients:
The Power of Brown Sugar vs. White Sugar
The high ratio of brown sugar to white sugar is intentional. Brown sugar is acidic and contains molasses, which reacts with the baking soda to create a softer, more moist, and chewier cookie. White sugar helps with spread and crispness around the edges.
Mini Chips are Essential
While large chocolate chunks are great for gourmet cookies, the school cookie aesthetic demands mini semi-sweet chocolate chips. They melt slightly more uniformly and ensure you get a little bit of chocolate in every single bite.
Nut-Free for the Classroom
Safety first! While traditional school cookies sometimes included walnuts, many modern schools are strictly nut-free. This recipe, as written, is nut-free.
If you are packing these for a school lunch, always verify the school’s policy. For other great, safe options, check out my comprehensive list of the Best Nut-Free School Lunch Cookies.
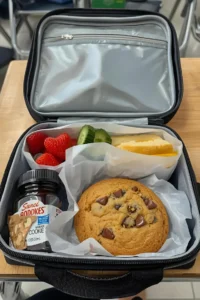
Serving and Pairing for Busy Moms
These giant cookies are a perfect dessert or after-school snack, but they also travel exceptionally well.
The Ultimate Lunchbox Treat
These cookies pair wonderfully with savory lunch options. For a well-rounded and effortless midday meal, consider preparing quick and easy mains. If you’re looking for more fast and satisfying ideas, explore my other Healthy Lunchbox Recipes for Kids, including simple options like Quick Chicken Wraps for Busy Moms.
Frequently Asked Questions (FAQ)
Q: Why are my cookies cakey? A: This is the most common issue. Cakiness is usually caused by overmixing the dough (which incorporates too much air) or not using enough brown sugar/fat (resulting in a lack of moisture). Ensure you stop mixing the flour as soon as the streaks disappear, and do not skip the extra egg yolk.
Q: Can I freeze the cookie dough? A: Absolutely. Scoop the dough into the flattened disks, place them on a tray, and freeze until solid. Transfer the frozen disks to a freezer bag. When ready to bake, place them directly on a baking sheet and add 2–4 minutes to the total baking time.
Q: What if I don’t have mini chocolate chips? A: You can use regular chocolate chips, but for the best copycat experience, roughly chop a standard semi-sweet chocolate bar. This mimics the melt and distribution of the mini chips perfectly.